Getting Started
WooCommerce Layouts
Layout pages & sections
File structure
You can download the product from the My Account –> Download
After the purchase of the Butterfly WooCommerce Divi layouts, you’ll get the following file.
- butterfly-divi-layouts-x.x.zip (where x.x is a version number)
Extract the above file and you will get two files as below.
File 1: product.zip
File 2: supplementary-files.zip
File 1: product.zip
Extract this zip and you will get the following .json files
- Cart.json
- Checkout.json
- Products.json
- Sections.json
- Shop.json
All the above categories contain their respective layouts in a single JSON file. If you want to use only a single layout of a specific category then import the file from the supplementary files.
File 2: supplementary-files.zip
Here you will get the .json file of each layout separately.
Home
In this folder, you will get 8 separate .json Divi Page files of each home layout.
- Home Page 01.json
- Home Page 02.json
- Home Page 03.json
- Home Page 04.json
- Home Page 05.json
- Home Page 06.json
- Home Page 07.json
- Home Page 08.json
About Us
In this folder, you will get 2 separate .json Divi Page files of each about layout.
- About Page 01.json
- About Page 02.json
Contact Us
In this folder, you will get 2 separate .json Divi Page files of each contact layout.
- Contact Page 01.json
- Contact Page 02.json
Blog
In this folder, you will get 2 separate .json Divi Page files of each category & post layout.
- Post Category 01.json
- Post Category 02.json
- Post Details 02.json
Others
In this folder, you will get 3 separate .json Divi Page files of each contact sigle layout.
- FAQs.json
- Coming Soon.json
- 404.json
Sections
In the section, you will get one .json Divi Library Layout file named Butterfly Section.json
- Butterfly Section.json
In the supplementary-files.zip you will get all the WooCommerce layouts as in the main product file. But here you will get a single .json file of each layout.
Installation
From now on you will get separate JSON files for each layout.
For the installation documentation of each layout category, links are given below.
Steps to Import the Divi Theme Builder Templates (Cart, Product, Checkout, Shop, Blog, Post)
To install all the theme builder layouts at once follow the below steps:
- After downloading the butterfly-divi-layouts.zip, Extract it to get Divi-Theme-Builder-Templates.json.
- Then on WordPress Dashboard >> go to Divi >> Theme Builder.
- Click on the Portability Icon, placed on the top right side of the window.
- Go to Import tab >> Choose File and browse for the DIVI-Theme-Builder-Templates.json
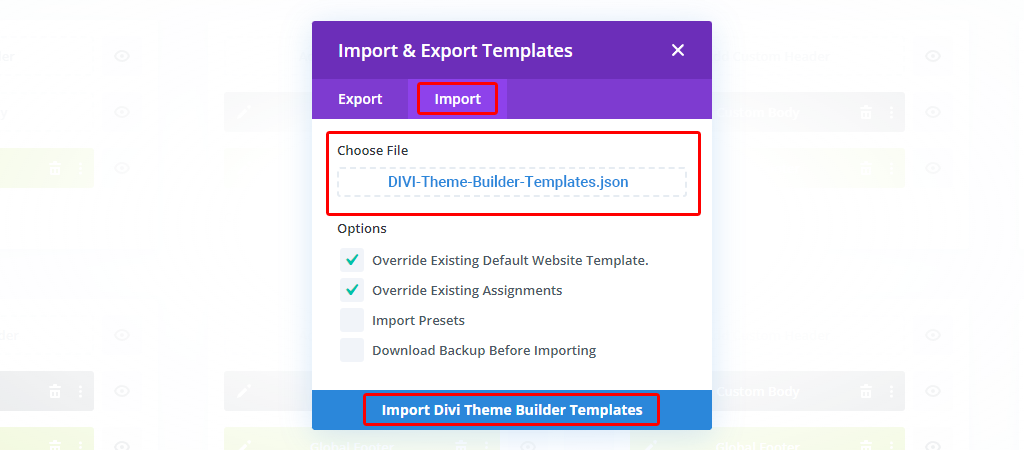
- Click on Import Divi Theme Builder Templates.
- This will import all the layouts to your Divi Theme builder.
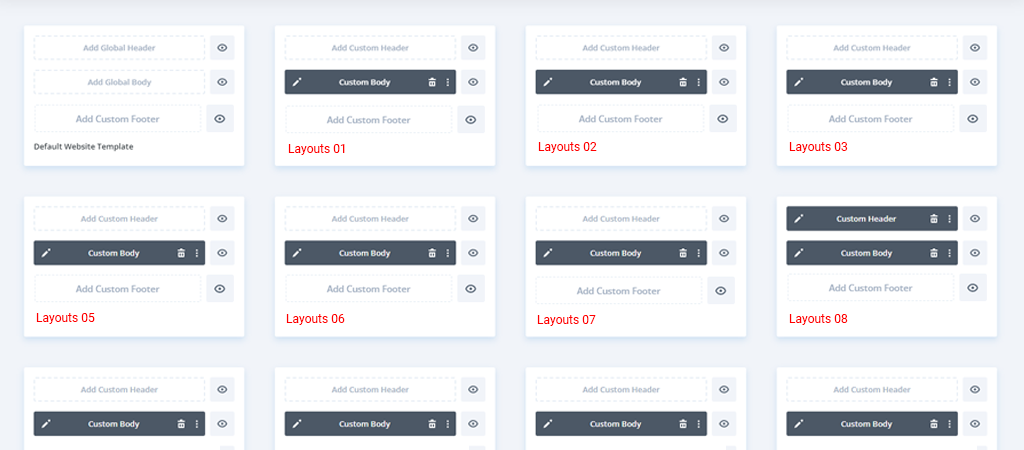
If you want to install any specific layout type, then please move to the following document link:
Steps to Import the Divi Library Layouts(Pages & Sections)
Click here to know the import process of Pages & Sections.
Products
Steps to Import the Products Layout
To import all the product layouts at once
- Extract the main product file butterfly-layouts.zip to get the Products.json file.
- Import the file into the Divi Theme Builder.
- To do this move to your site Dashboard >> Divi >> Theme Builder.
- Click on the Portability Icon, placed on the top right side of the window.
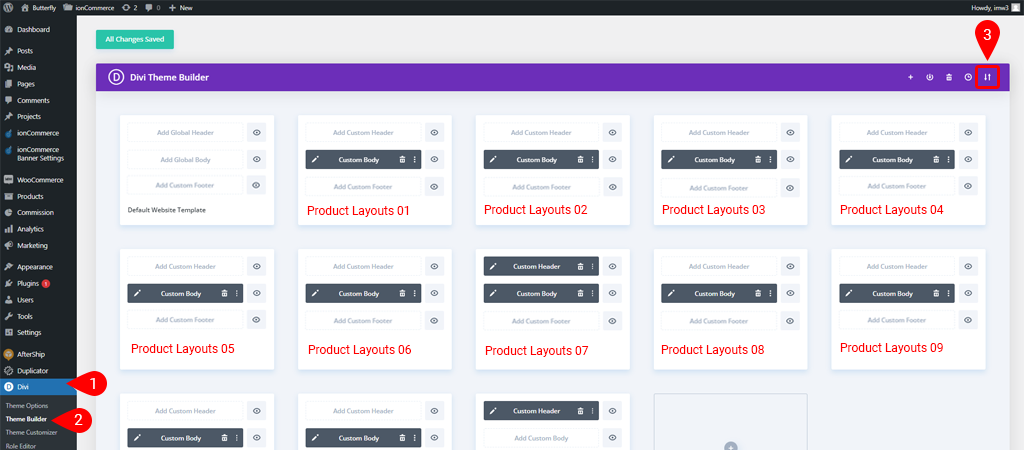
Click on the top right portability icon
5. Go to Import tab >> Choose File and browse for the Products.json
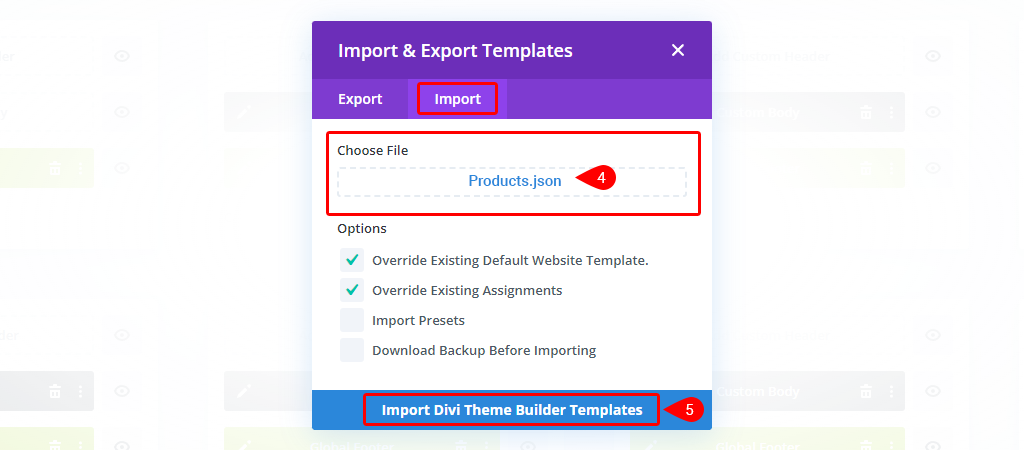
6. Click on Import Divi Theme Builder Templates.
Now you have all the Products Layouts in your Divi Theme Builder.
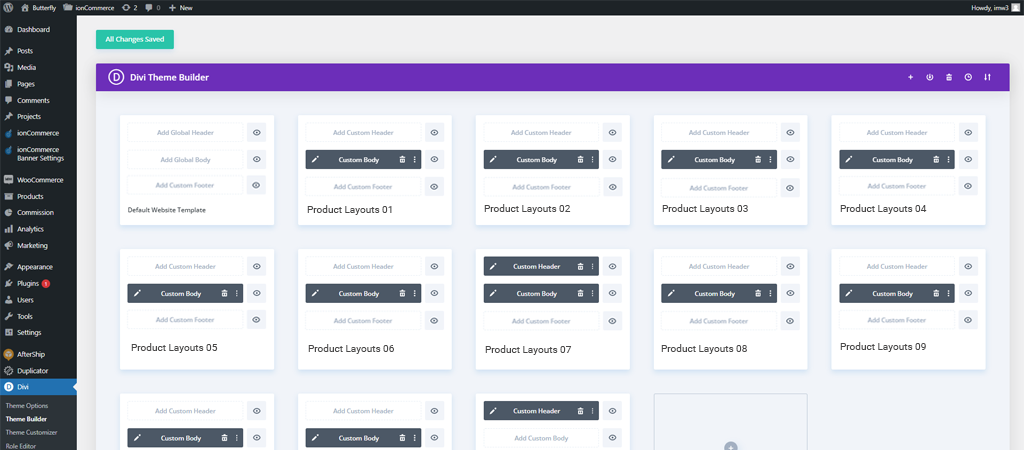
To import the specific product layout
If you want to import a specific product layout then move to the product file that you have in supplementary-files.zip and choose the specific product layout’s JSON file to import in the Divi Theme Builder and follow the same process as above.
- Product-01.json
Layout Assignment
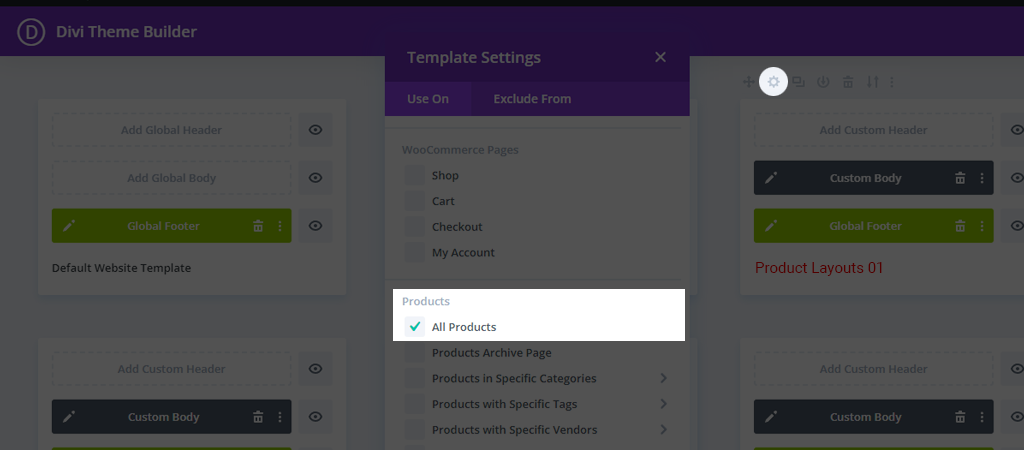
To assign a Product Page Layout move to one of the product page layouts, and click on the Setting icon as shown in the below screenshot.
In the assignment list, choose All Products and save changes.
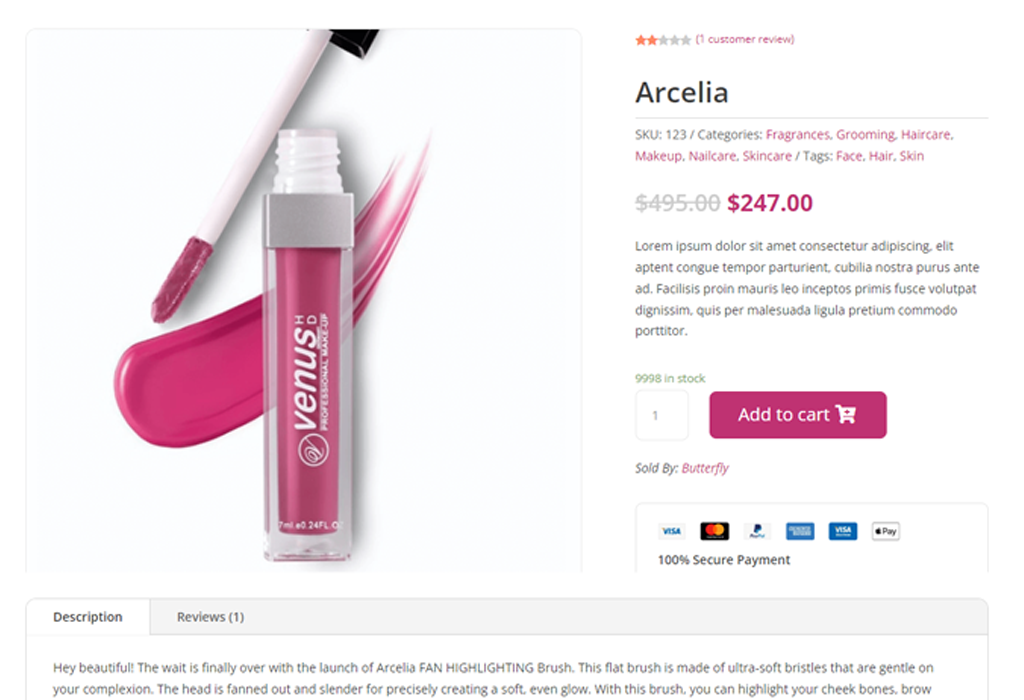
This is not necessary to use the same product layout for all products. You can assign different layouts to the specific product as per your need.
Shop
Steps to Import the Shop Layout
To import all the shop layouts at once
- Extract the main product file butterfly-layouts.zip to get the Shop.json file.
- Import the file into the Divi Theme Builder.
- To do this move to your site Dashboard >> Divi >> Theme Builder.
- Click on the Portability Icon, placed on the top right side of the window.

Click on the top right portability icon
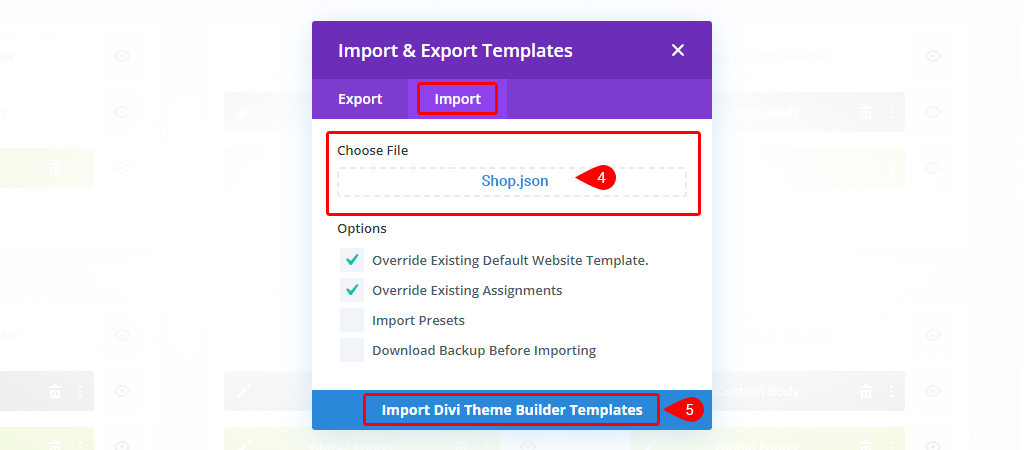
6. Click on Import Divi Theme Builder Templates.
Now you have all the Shop Layouts in your Divi Theme Builder.
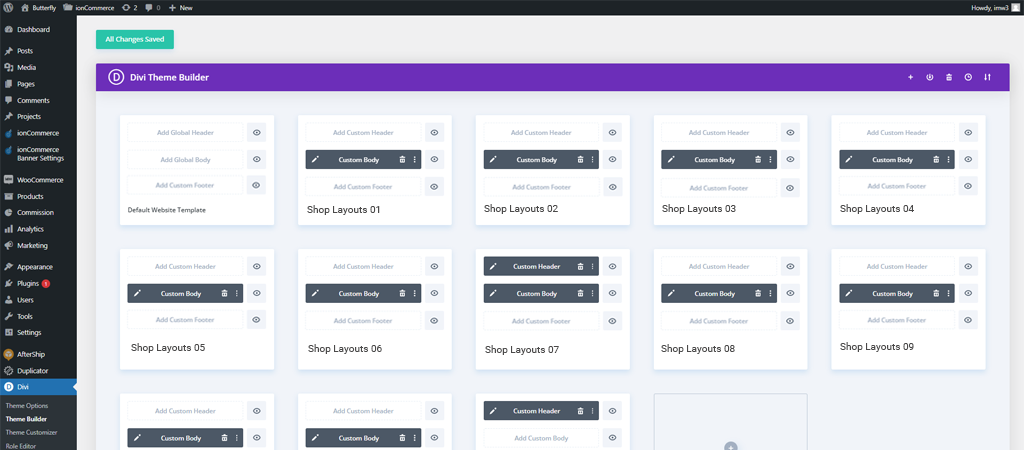
To import the shop product layout
If you want to import a specific shop layout then move to the shop file that you have in supplementary-files.zip and choose the specific shop layout’s JSON file to import in the Divi Theme Builder and follow the same process as above.
- Shop-01.json
Layout Assignment
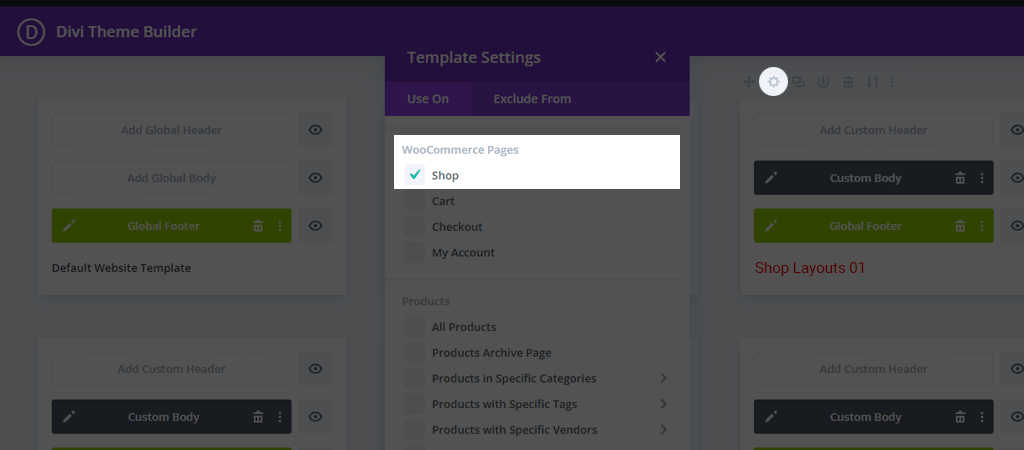
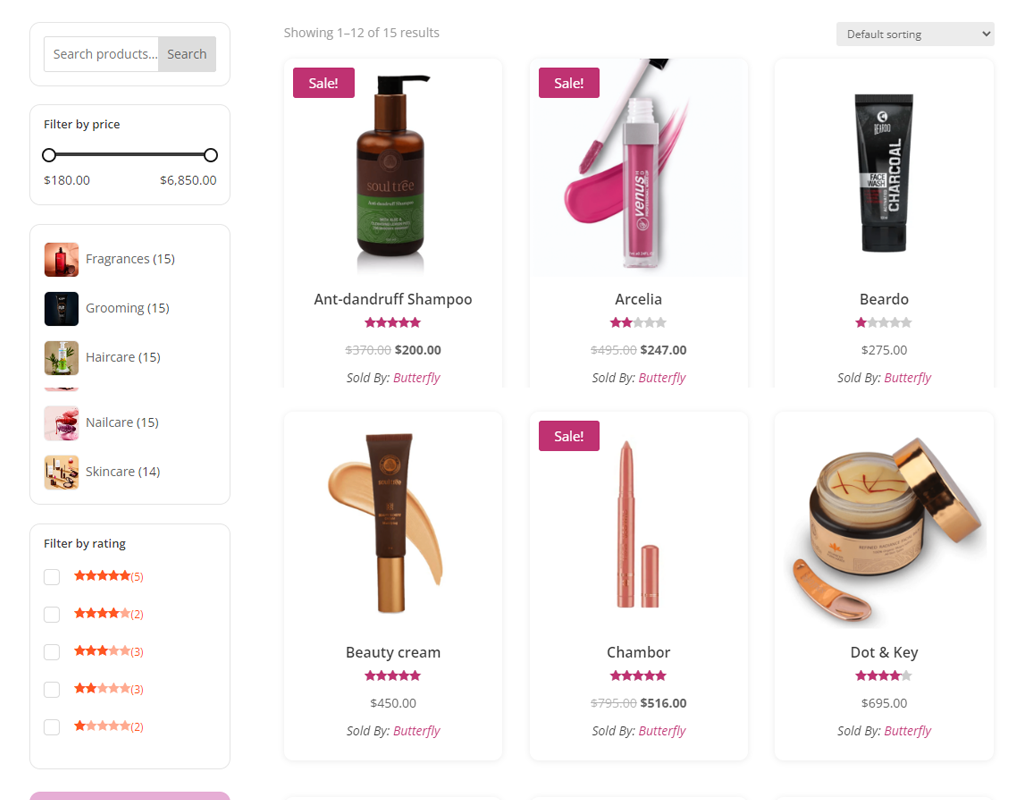
To assign a Shop Page Layout move to one of the shop page layouts and click on the Setting icon of the template, assign that to Shop pages, and save changes.
Checkout
Steps to Import the Checkout Layout
To import all the checkout layouts at once
- Extract the main product file butterfly-layouts.zip to get the Checkout.json file.
- Import the file into the Divi Theme Builder.
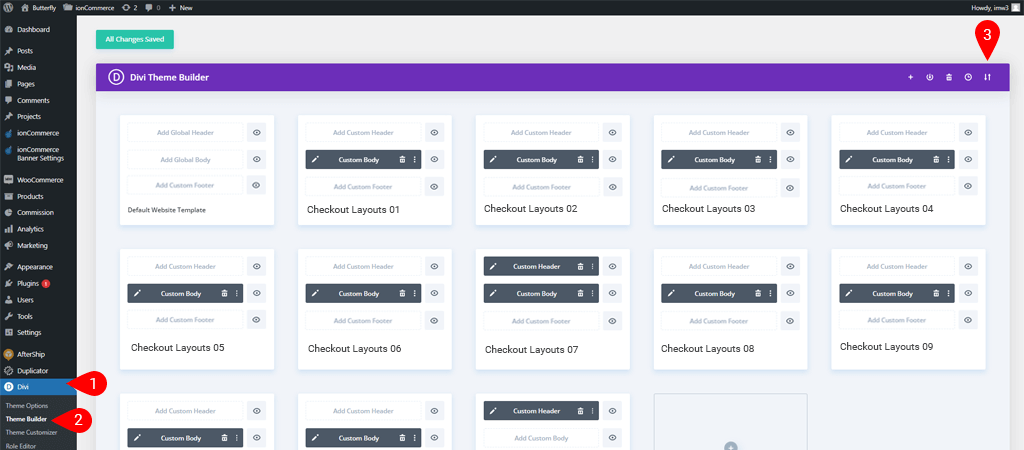
- To do this move to your site Dashboard >> Divi >> Theme Builder.
- Click on the Portability Icon, placed on the top right side of the window.

Click on the top right portability icon
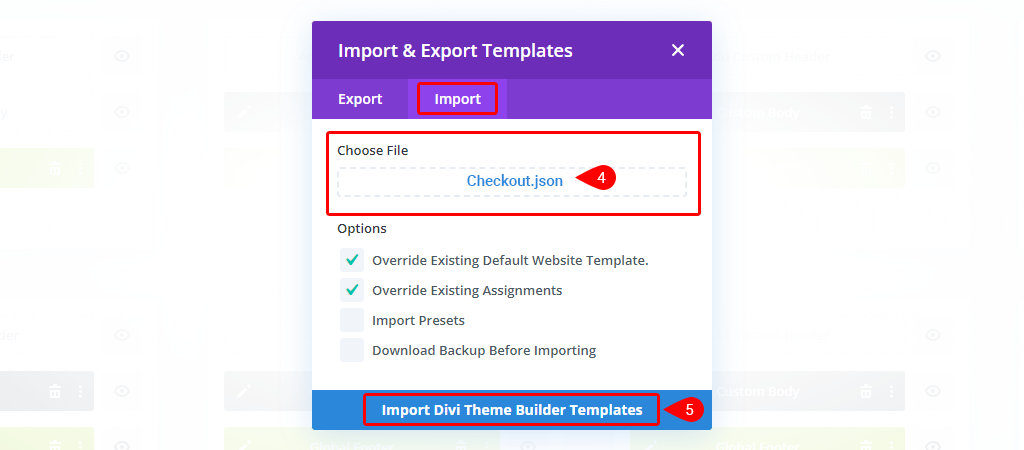
Now you have all the Checkout Layouts in your Divi Theme Builder.
To import the specific checkout layout
If you want to import a specific checkout layout then move to the checkout file that you have in supplementary-files.zip and choose the specific checkout layout’s JSON file to import in the Divi Theme Builder and follow the same process as above.
- Checkout-01.json
Layout Assignment
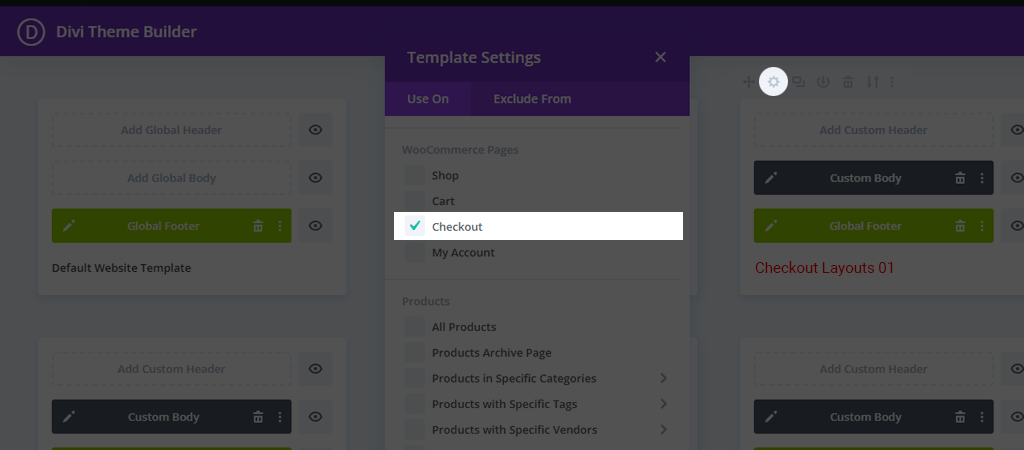
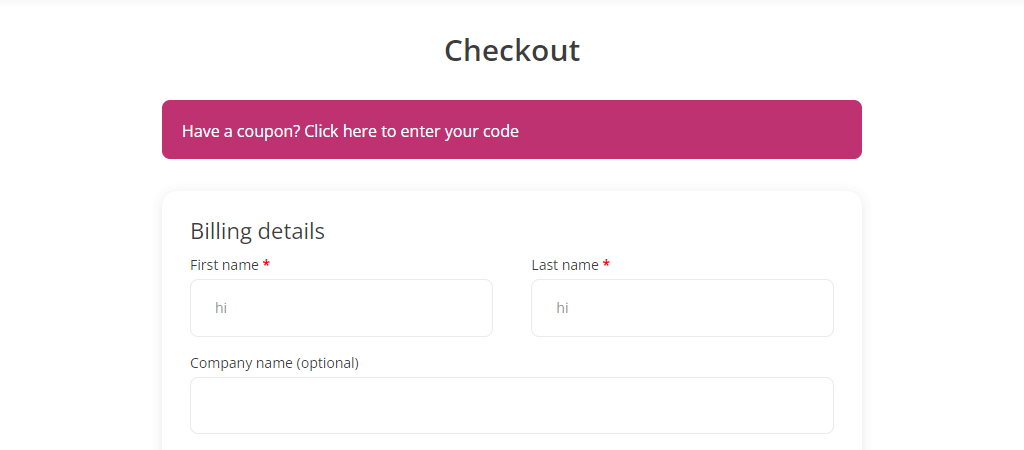
To assign a checkout layout, choose any checkout layout, click on the Settings icon of the template, assign that to the checkout page and save changes.
Cart
Steps to Import the Cart Layout
To import all the Cart layouts at once
- Extract the main product file butterfly-layouts.zip to get the Cart.json file.
- Import the file into the Divi Theme Builder.
- To do this move to your site Dashboard >> Divi >> Theme Builder.
- Click on the Portability Icon, placed on the top right side of the window.
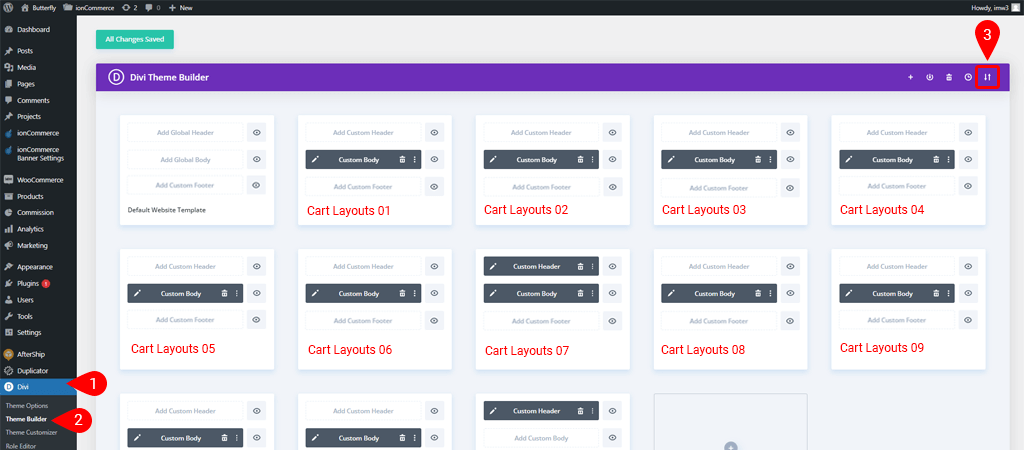
Click on the top right portability icon
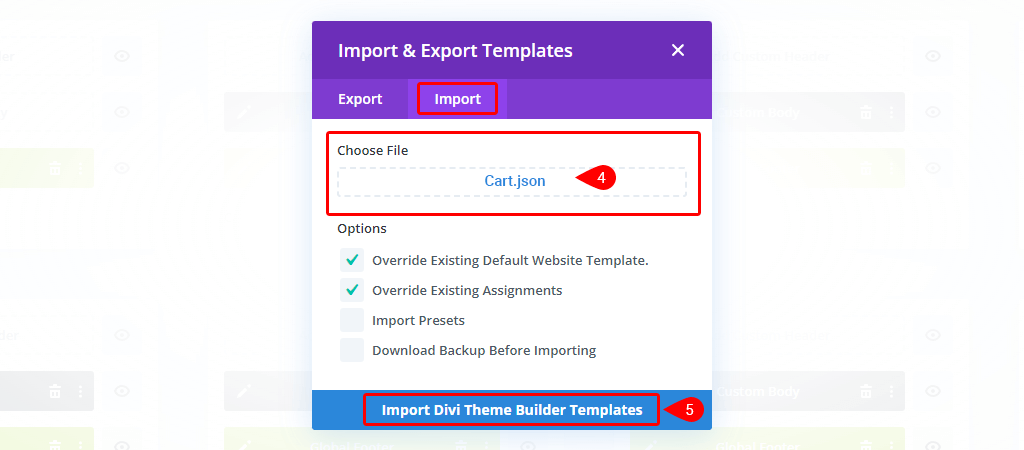
Now you have all the Cart Layouts in your Divi Theme Builder.
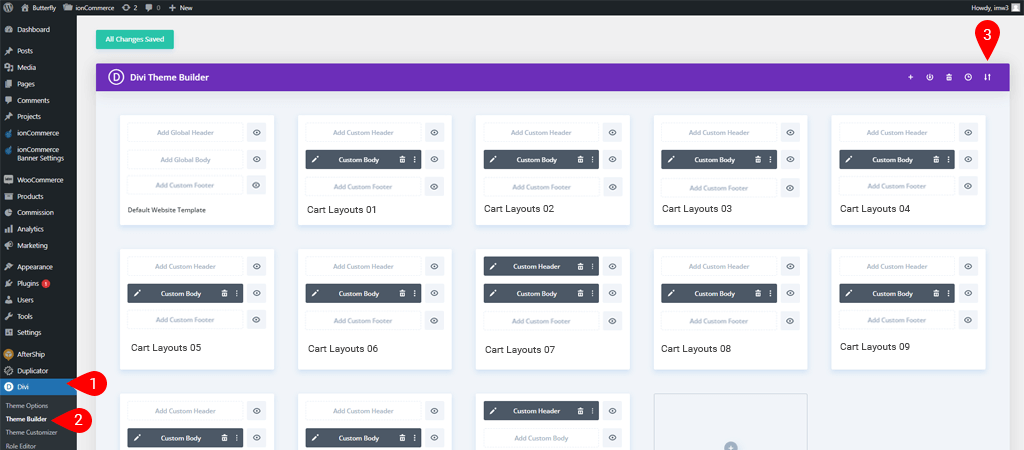
To import the Cart layout
If you want to import a specific cart layout then move to the Cart file that you have in supplementary-files.zip and choose the specific shop layout’s JSON file to import in the Divi Theme Builder and follow the same process as above.
- Cart-01.json
Layout Assignment
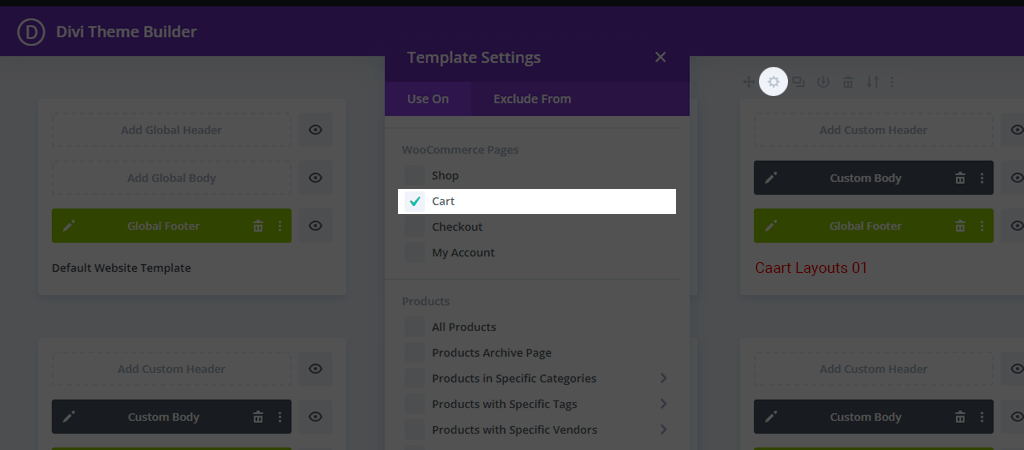
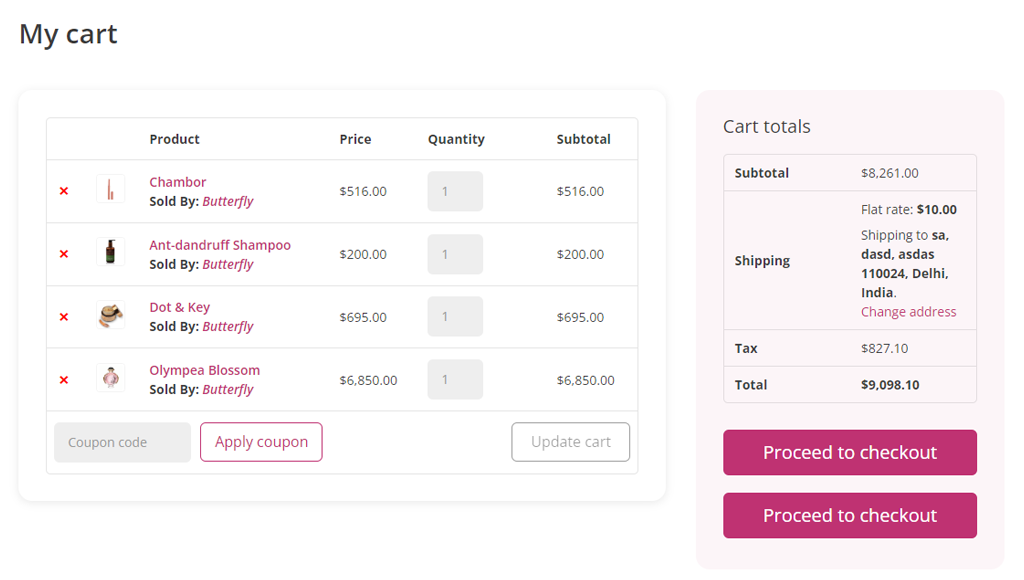
To assign a cart layout choose any cart layout, click on the Setting icon of the template, assign that to cart pages and save changes.
Blog
Steps to Import the Blog Layout
To import all the Blog layouts at once
- Extract the main product file butterfly-layouts.zip to get the Blog.json file.
- Import the file into the Divi Theme Builder.
- To do this move to your site Dashboard >> Divi >> Theme Builder.
- Click on the Portability Icon, placed on the top right side of the window.
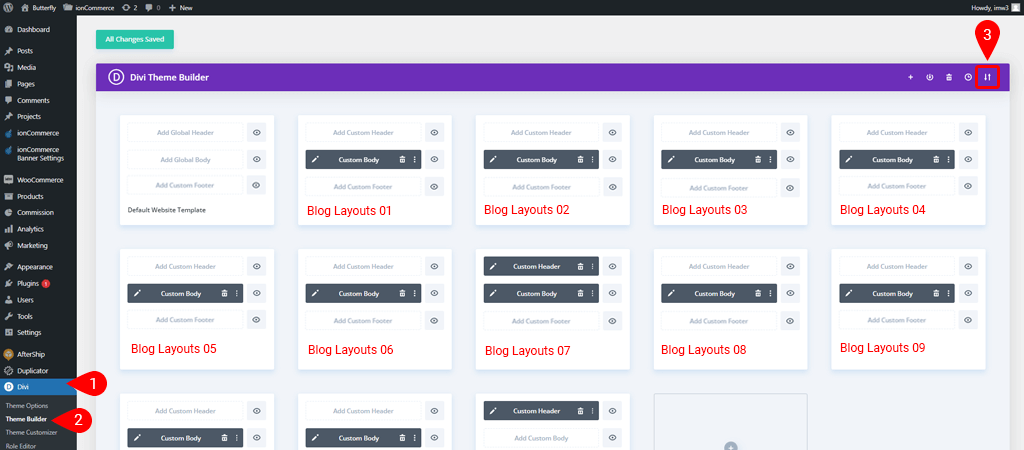
Click on the top right portability icon
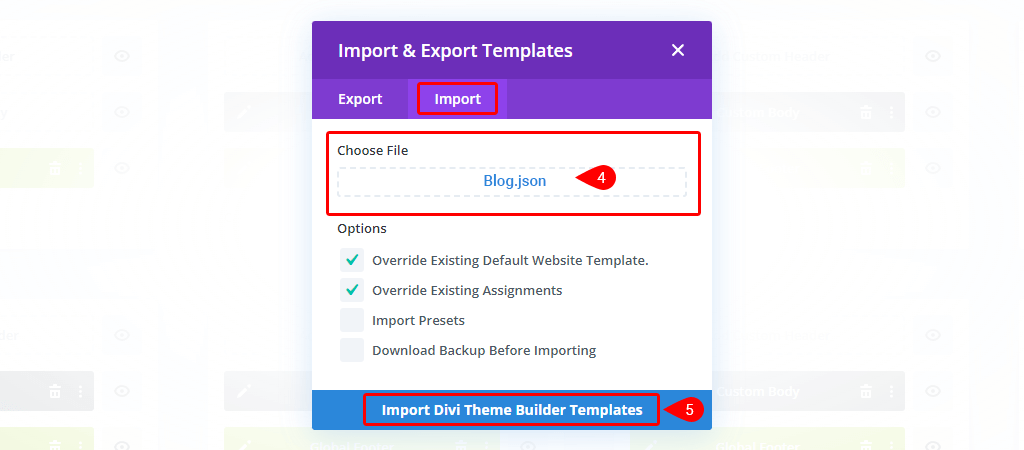
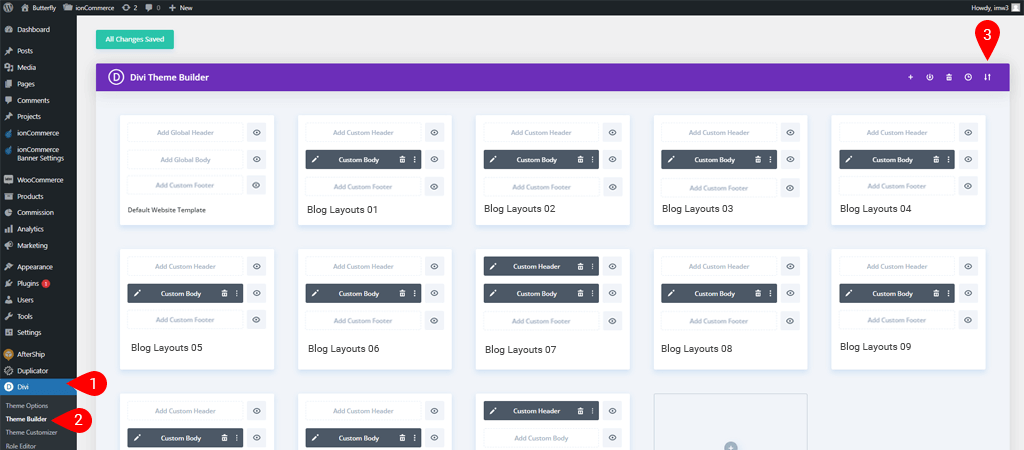
Now you have all the Blog Layouts in your Divi Theme Builder.
To import the specific Blog layout
If you want to import a specific blog layout then move to the blog file that you have in supplementary-files.zip and choose the specific blog layout’s JSON file to import in the Divi Theme Builder and follow the same process as above.
- Blog -01.json
- Blog -02.json
Layout Assignment
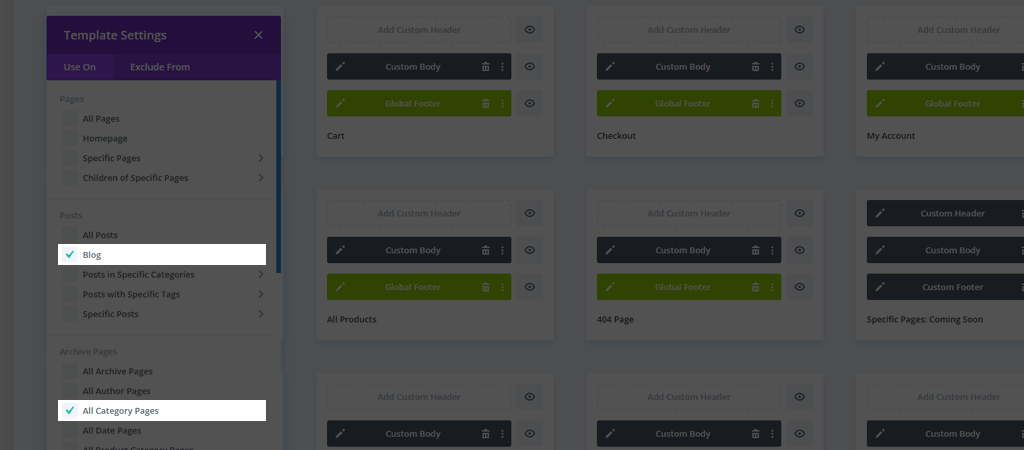
To assign a blog layout, choose any blog layout, click on the Settings icon of the template, assign that to the blog page and save changes.

Posts
Steps to Import the all post Layout
To import all the post layouts at once
- Extract the main product file butterfly-layouts.zip to get the all-post.json file.
- Import the file into the Divi Theme Builder.
- To do this move to your site Dashboard >> Divi >> Theme Builder.
- Click on the Portability Icon, placed on the top right side of the window.

Click on the top right portability icon

Now you have all the post Layouts in your Divi Theme Builder.
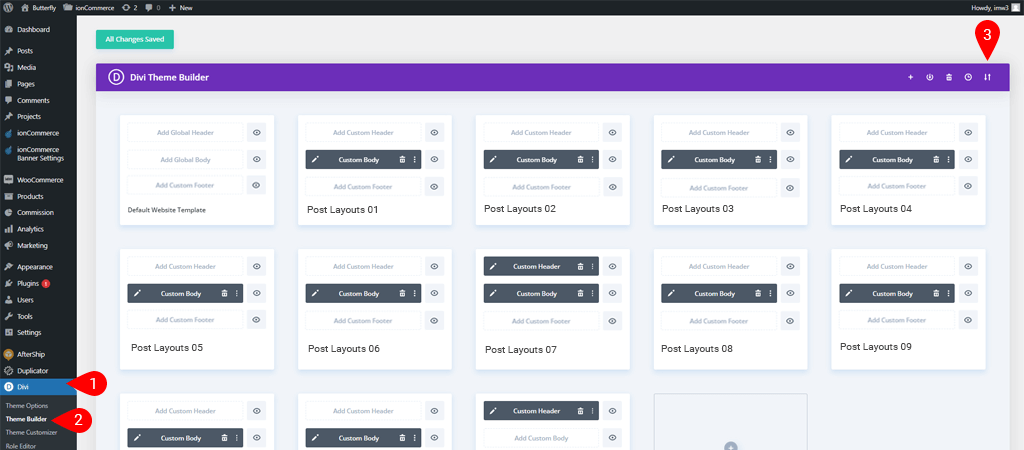
To import the all post layout
If you want to import a specific post layout then move to the post file that you have in supplementary-files.zip and choose the specific shop layout’s JSON file to import in the Divi Theme Builder and follow the same process as above.
- Post-01.json
Layout Assignment
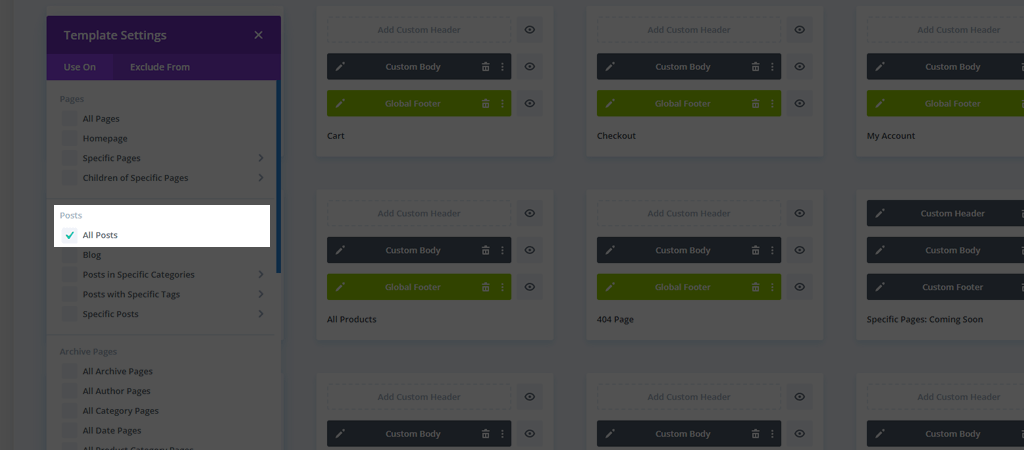
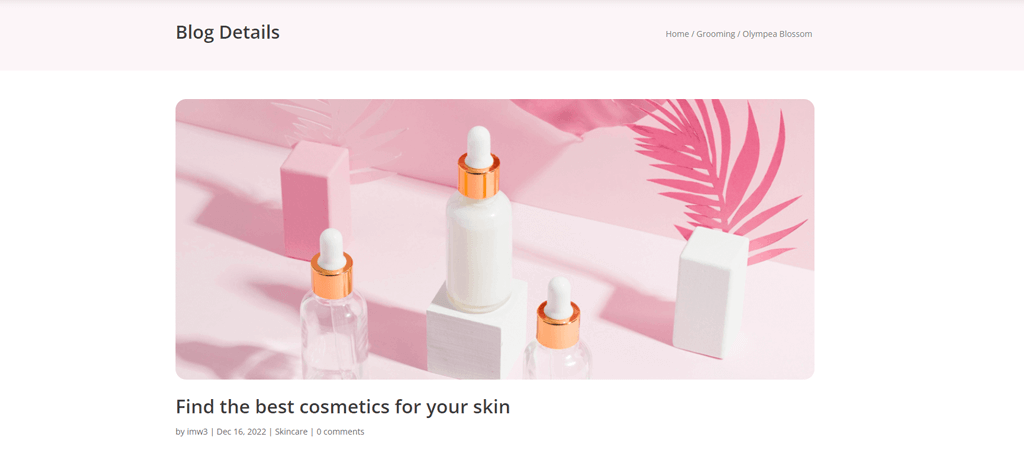
To assign a all post layout choose any post layout, click on the Setting icon of the template, assign that to all post pages and save changes.
404
Steps to Import the 404 Layout
To import all the 404 layouts at once
- Extract the main product file butterfly-layouts.zip to get the 404.json file.
- Import the file into the Divi Theme Builder.
- To do this move to your site Dashboard >> Divi >> Theme Builder.
- Click on the Portability Icon, placed on the top right side of the window.
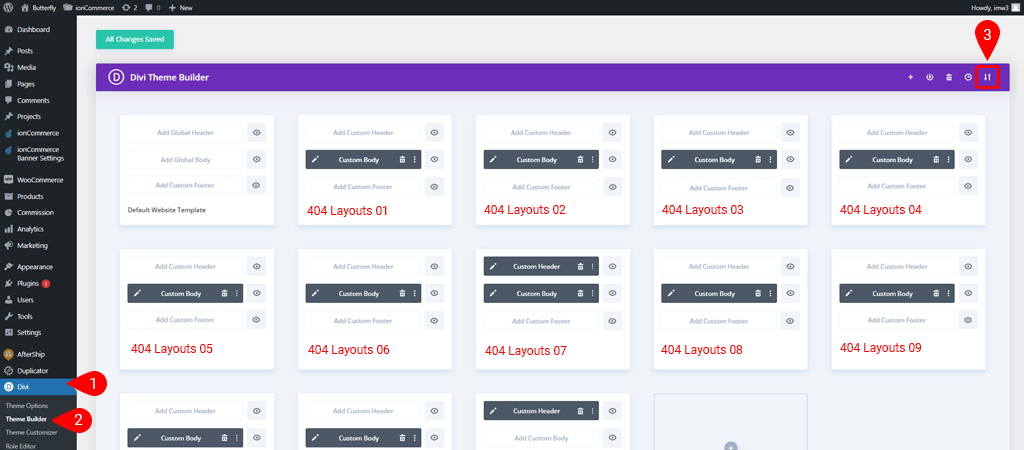
Click on the top right portability icon
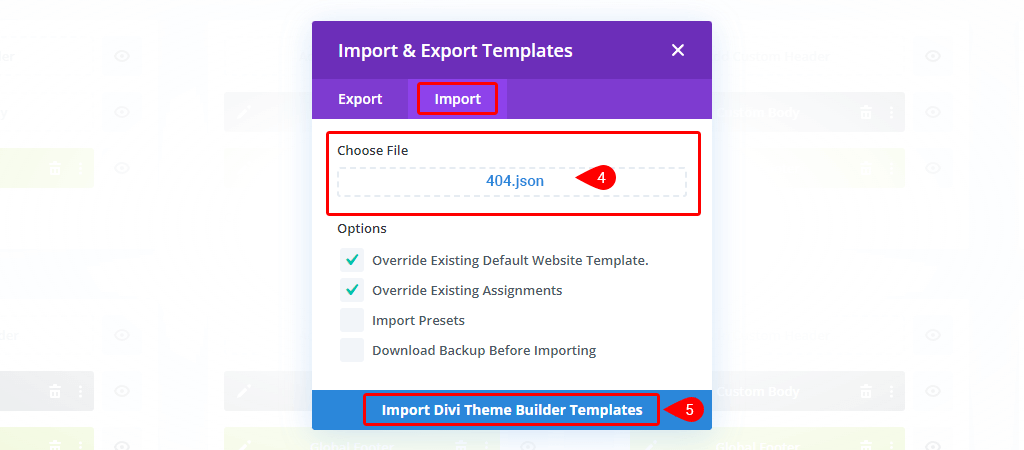
Now you have all the 404 Layouts in your Divi Theme Builder.
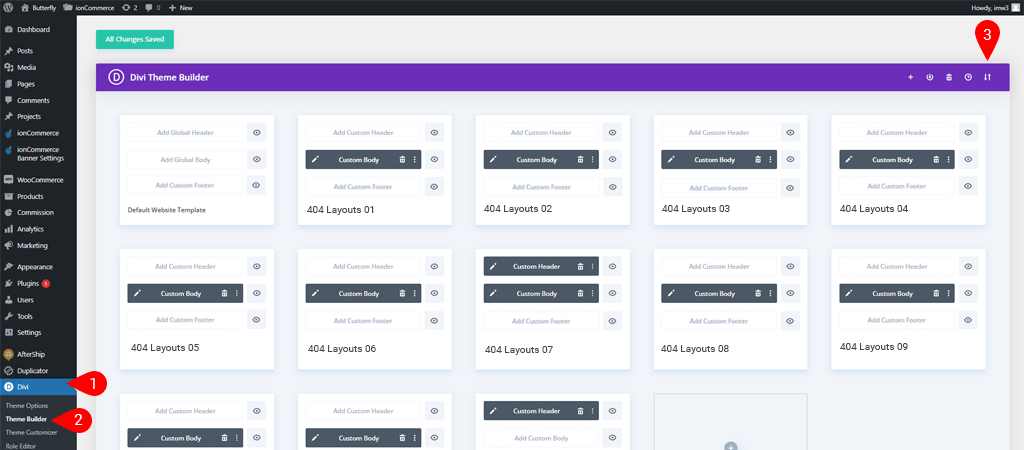
To import the all 404 layout
If you want to import a specific 404 layout then move to the 404 file that you have in supplementary-files.zip and choose the specific 404 layout’s JSON file to import in the Divi Theme Builder and follow the same process as above.
- 404-01.json
Layout Assignment
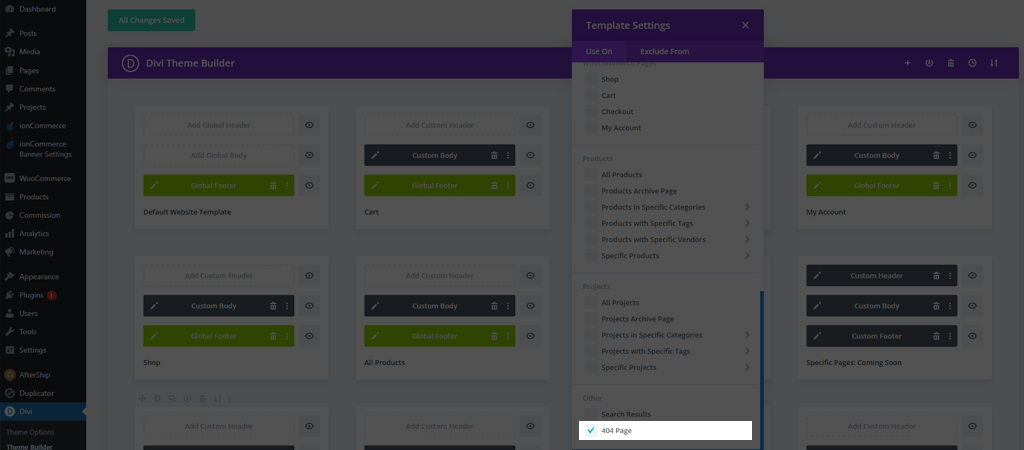
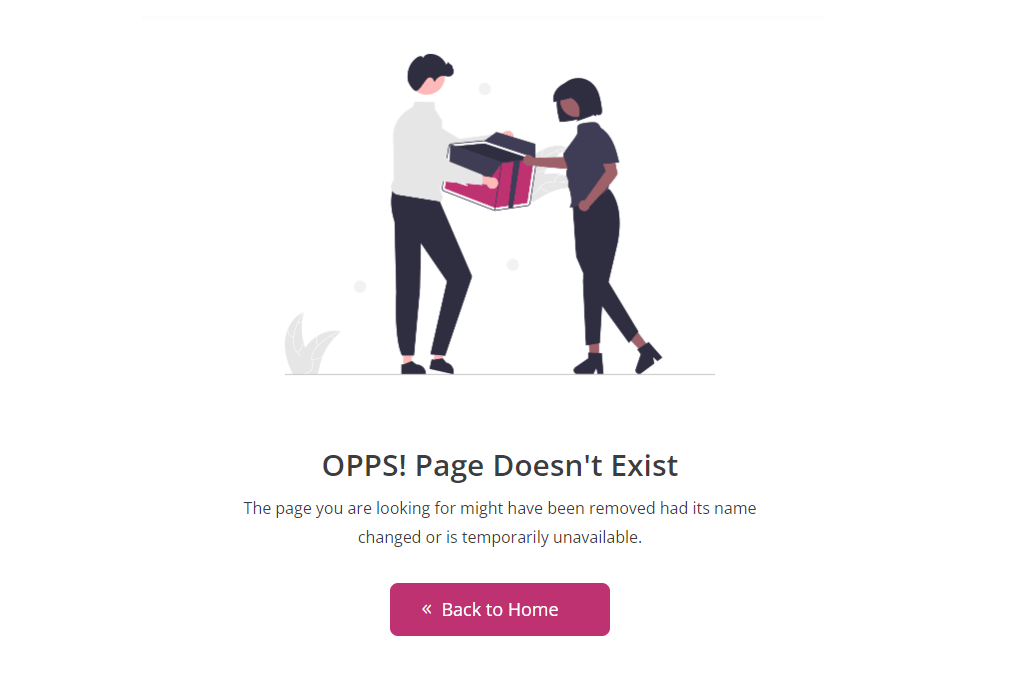
To assign a 404 layout choose any 404 layout, click on the Setting icon of the template, assign that to 404 pages and save changes.
Pages
Steps to Import the specific page layout
- Extract the main product file butterfly-layouts.zip to get the Page-Name.json file
- Then on WordPress Dashboard go to Divi>>Divi Library.
Page layouts
- My Account Page.json
- Home
- Home Page 01.json
- Home Page 02.json
- Home Page 03.json
- Home Page 04.json
- Home Page 05.json
- Home Page 06.json
- Home Page 07.json
- Home Page 08.json
- About Us
- About Page 01.json
- About Page 02.json
- Contact Us
- Contact Page 01.json
- Contact Page 02.json
- Others
- FAQs.json
- Coming Soon.json
- 404.json
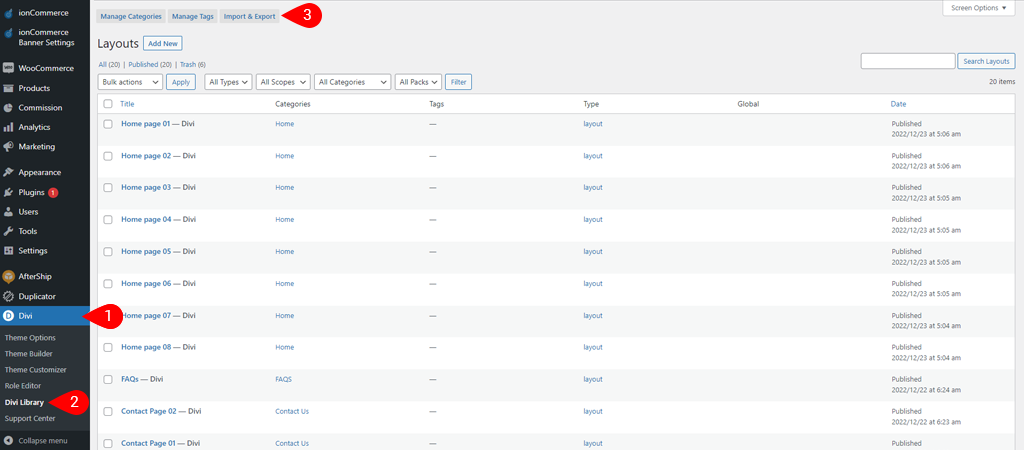
- Click on Import and Export tab.
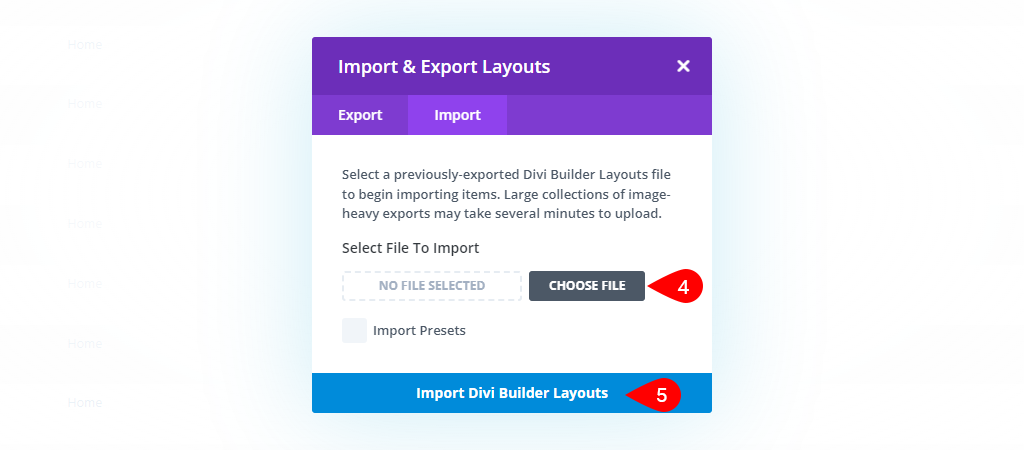
- On the pop-up window go to the Import tab and browse the “Page-name.json” file from your computer and click on the Import Divi Builder Layouts button.
How to add Butterfly Page Layouts on page from library
To add the Butterfly Page layouts on the page from the Divi Library follow the instructions described below.
- To do this move to your site Dashboard >> Pages >> All Pages >> Your Page (ex: my account, about, contact, FAQs, etc.).
- Edit the specific page with DIVI
- Click on the Edit With Divi

Click on Edit with DIVI

Click on Add From Library

Here you can select the section you desired.

Here you can view the live demo and edit the page layouts as well as your requirement.
Final Output:

Sections
Steps to Import the Divi Library Layouts
- Extract the main product file butterfly-layouts.zip to get the Sections.json file
- Then on WordPress Dashboard go to Divi>>Divi Library.

- Click on Import and Export tab.
- On the pop-up window go to the Import tab and browse the “SECTIONS.json” file from your computer and click on the Import Divi Builder Layouts button.

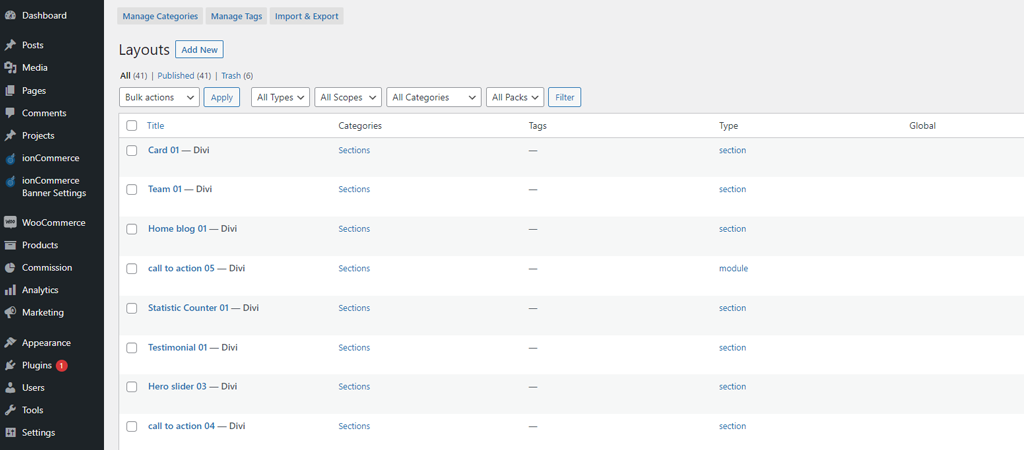
How to add Butterfly Sections on page from library
To add the Butterfly Sections on the page from the Divi Library follow the instructions described below.
Add a new page or edit the existing page >> Use the Divi Builder >> In wireframe mode of the page click on blue symbol for adding the new section.
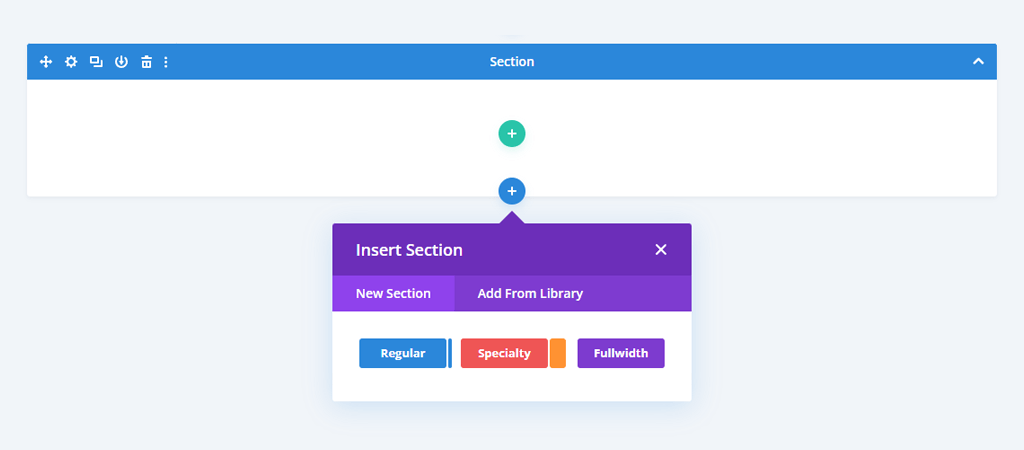
Click on Add From Library
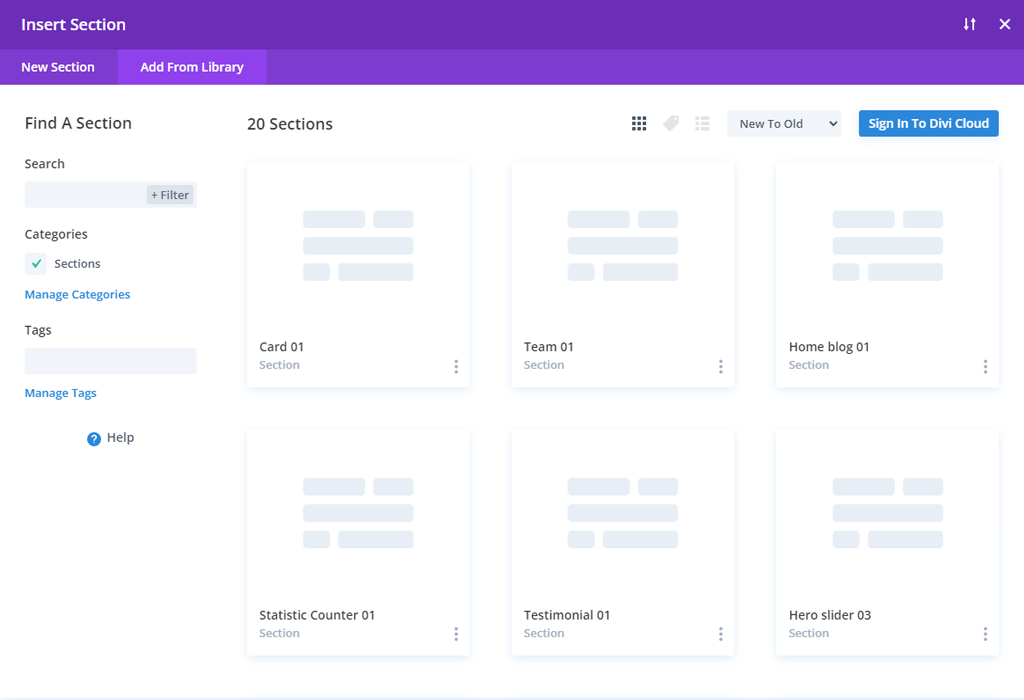
Here you can select the section you desired.
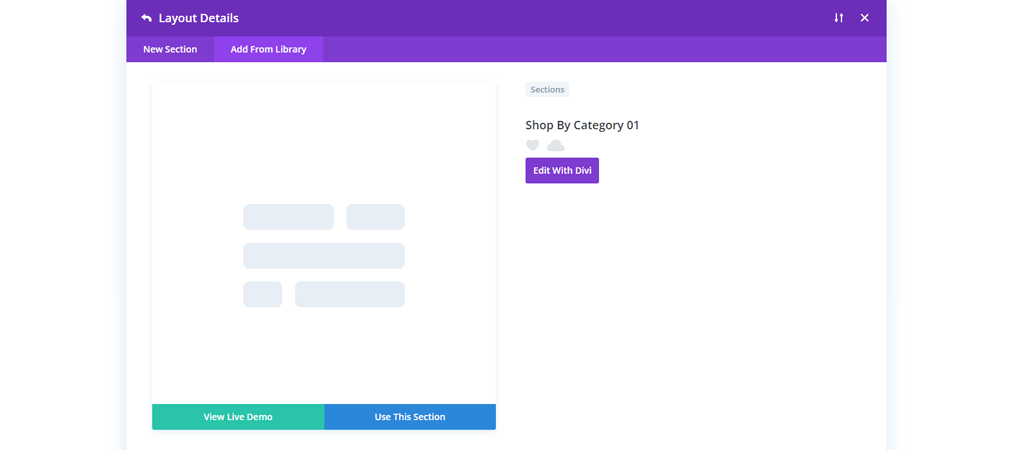
Here you can view the live demo and edit the section as well as your requirement.
Final Output:

Header & Footer
Steps to Import the Header or Footer Layouts
- Extract the main product file butterfly-layouts.zip to get the Header.json or Footer.json file
- Then on WordPress Dashboard go to Divi>>Divi Library.

- Click on Import and Export tab.
- On the pop-up window go to the Import tab and browse the “footer.json” file from your computer and click on the Import Divi Builder Layouts button.

How to add Butterfly Header or Footer on page from library
To add the Butterfly Header / Footer on the page from the Divi Library follow the instructions described below.
- To do this move to your site Dashboard >> Divi >> Theme Builder.
- Click on the Global Header / Footer or Add Custom Header / Footer, of the templates.


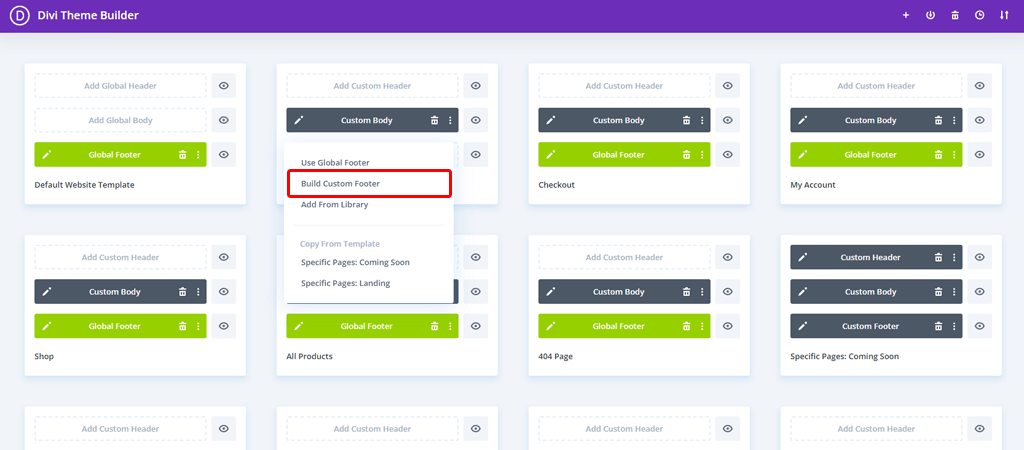

Click on Add From Library
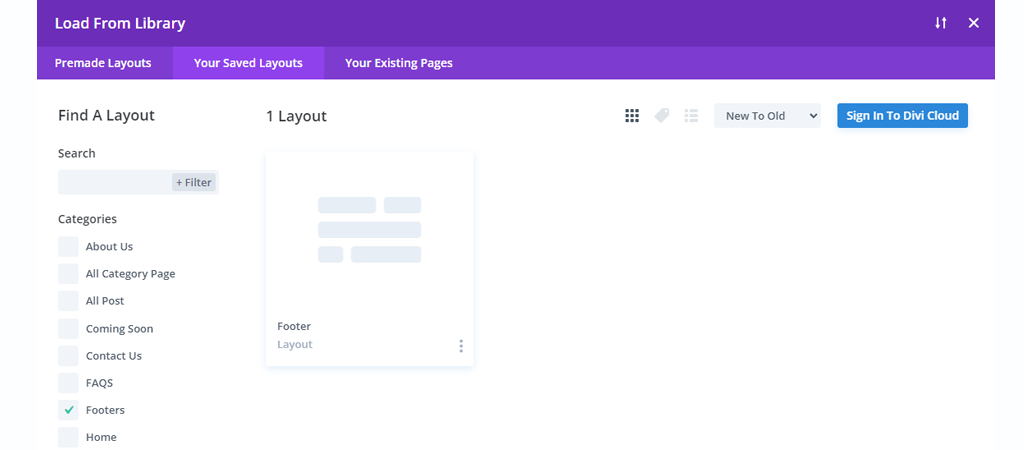
Here you can select the section you desired.
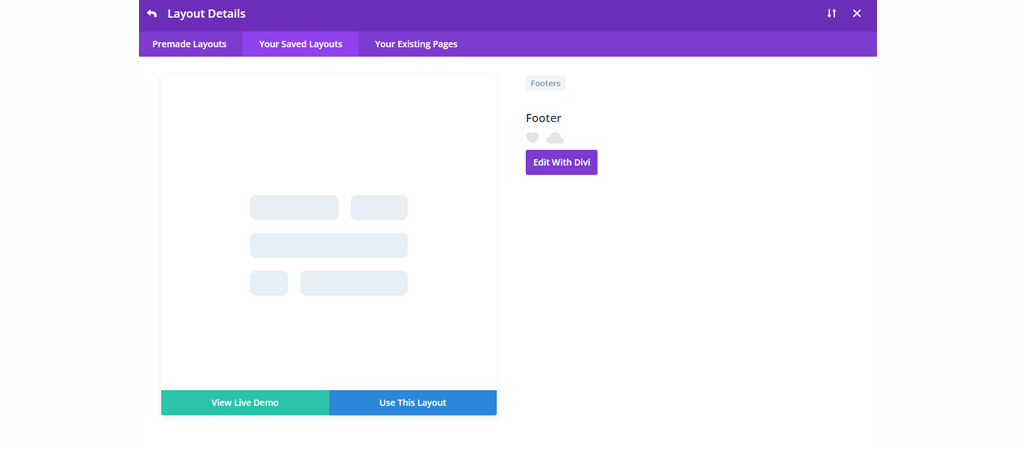
Here you can view the live demo and edit the header / footer as well as your requirement.
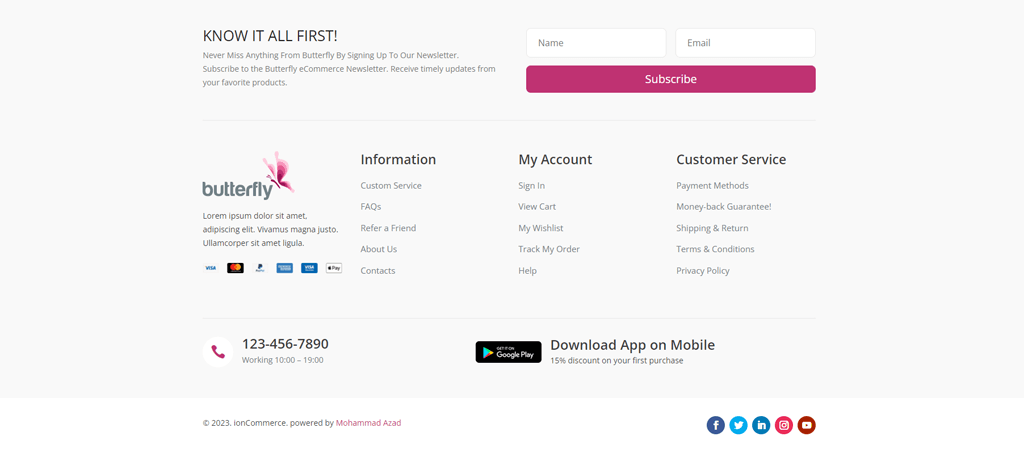
Final Output:
Missing sidebar content in the layout?
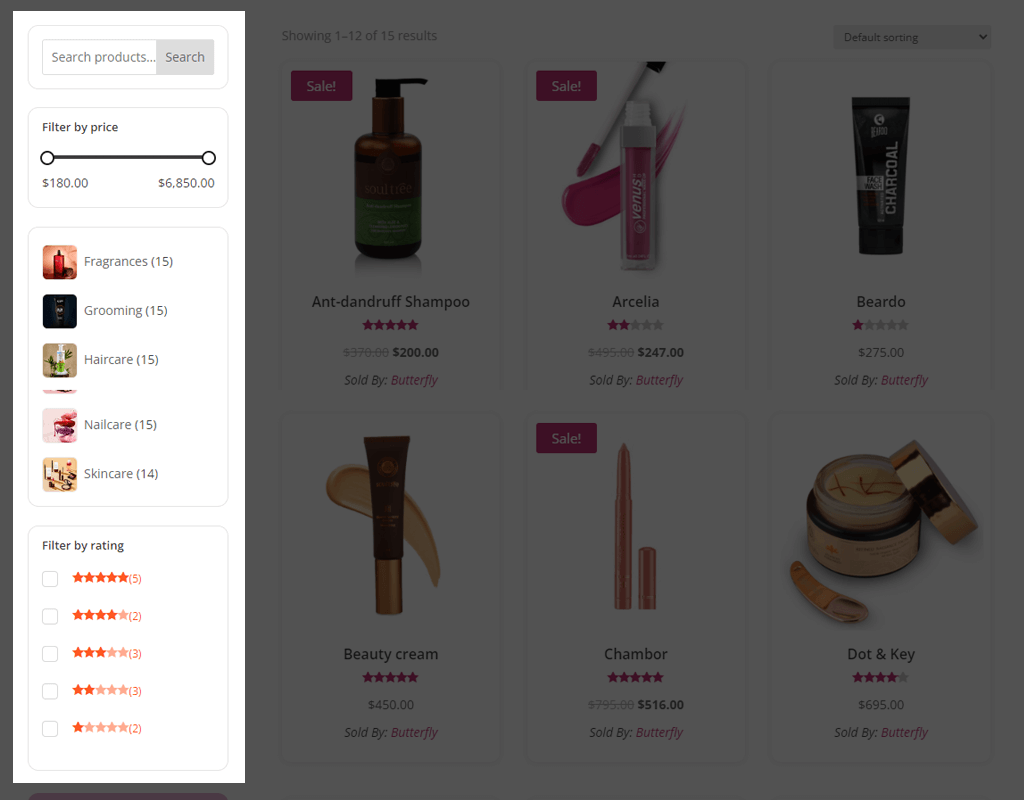
In order to add widgets navigate to the site Dashboard >> Appearance >> Widgets >> Sidebar >> Add the widgets here >> Click on Update.

